


If you’ve ever dreamed of sewing your own elegant evening dress, this DIY one-shoulder gown pattern is the perfect project. With a flowing floor-length skirt, pleated details, and a daring slit, this dress is ideal for formal events, weddings, or special occasions. In this guide, you’ll find the free sewing pattern (Size M) and full instructions to create this stunning design.
✂️ Materials You’ll Need
- 3 to 3.5 meters of flowy fabric (chiffon, crepe, satin, or similar)
- Lining fabric (optional, about 2 meters)
- Matching thread
- Invisible zipper (40 cm recommended)
- Fabric scissors
- Measuring tape
- Pins or sewing clips
- Sewing machine or serger
📏 Free Sewing Pattern
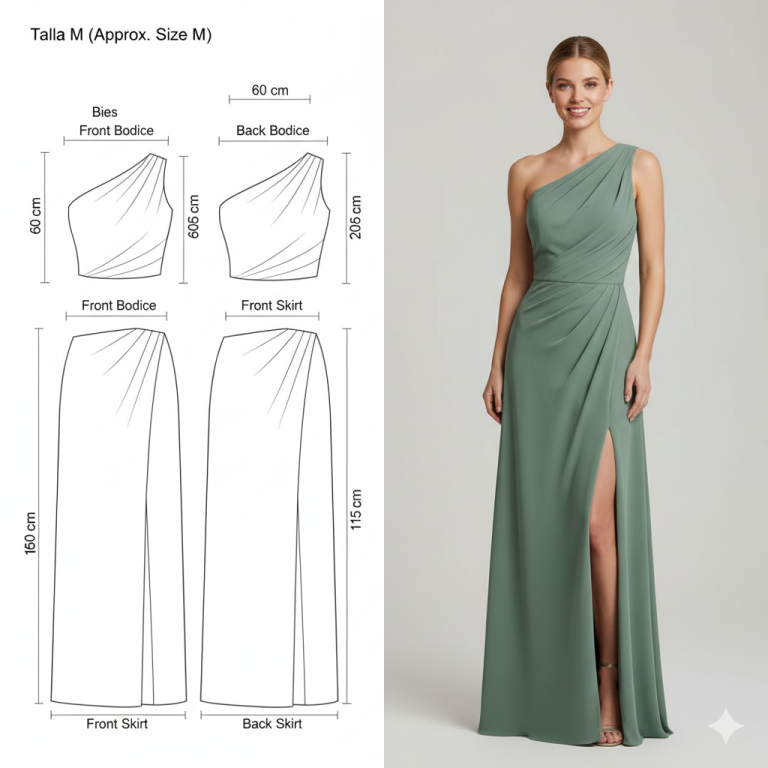
This gown is made up of four main parts:
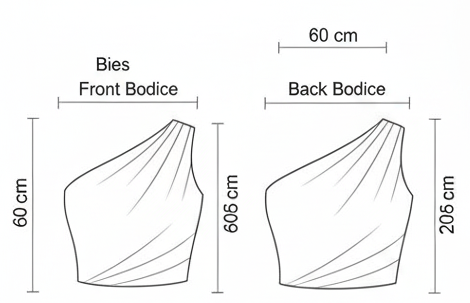
- Front bodice (one-shoulder, pleated)
- Back bodice
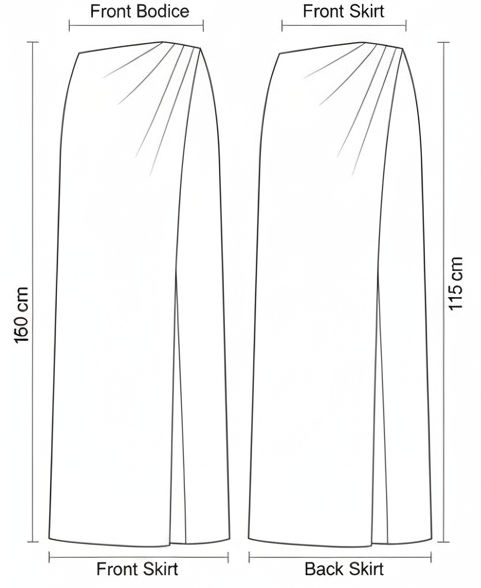
- Front skirt (with pleats and slit)
- Back skirt
Pattern Measurements (Approx. Size M)
- Front Bodice: 60.6 cm high × 60 cm wide
- Back Bodice: 20.6 cm high × 60 cm wide
- Front Skirt: 115 cm long × 160 cm wide
- Back Skirt: 115 cm long × 160 cm wide
🧵 Step-by-Step Sewing Instructions
1. Cutting the Fabric
- Cut 1 front bodice piece on the fold.
- Cut 1 back bodice piece on the fold.
- Cut 1 front skirt piece with slit.
- Cut 1 back skirt piece.
- If using lining, repeat all cuts with lining fabric.
2. Sewing the Bodice
- Create pleats on the front bodice as indicated in the pattern. Pin and secure them with stitches.
- Attach the back bodice to the front at the side seams.
- If lining, assemble the lining bodice the same way and join at the neckline for a clean finish.
3. Assembling the Skirt
- Sew the pleats on the front skirt and secure them.
- Attach the back skirt to the front at the side seams.
- Leave the slit open on the front skirt, finishing the edges with a narrow hem.
4. Joining Bodice and Skirt
- Attach the completed bodice to the skirt at the waistline.
- Ensure pleats align neatly at the seam.
5. Adding the Zipper
- Insert an invisible zipper at the center back seam.
- Sew the remaining seam below the zipper.
6. Hemming and Finishing
- Hem the skirt with a rolled hem for a light and elegant finish.
- Press all seams gently with a warm iron.
💡 Sewing Tips
- Choose flowy fabrics like chiffon or crepe to achieve the draped effect.
- Add lining for extra comfort and to prevent sheerness.
- Adjust the slit height according to your style preference.
- This pattern works beautifully in solid colors for a classic look or in prints for a modern twist.
✅ Final Thoughts
This DIY one-shoulder evening gown combines elegance with simplicity, making it the perfect handmade piece for weddings, proms, or special events. With just a few pleats and clean lines, you can create a professional-looking dress right at home.